Another favorite using my Silhouette Machine is how to use it to do paper piecing...well with Easter around the corner I thought I would share how to make a cute Easter Bunny for your Scrapbooking layouts. Remember this can be done with ANYTHING as long as you stick to the basics of tracing, breaking apart and cutting.
Let's get started:-
Step 1:
Find a picture on the Internet that you would like to use. I generally would look for FREE download patterns that way I am not coping something that I shouldn't.
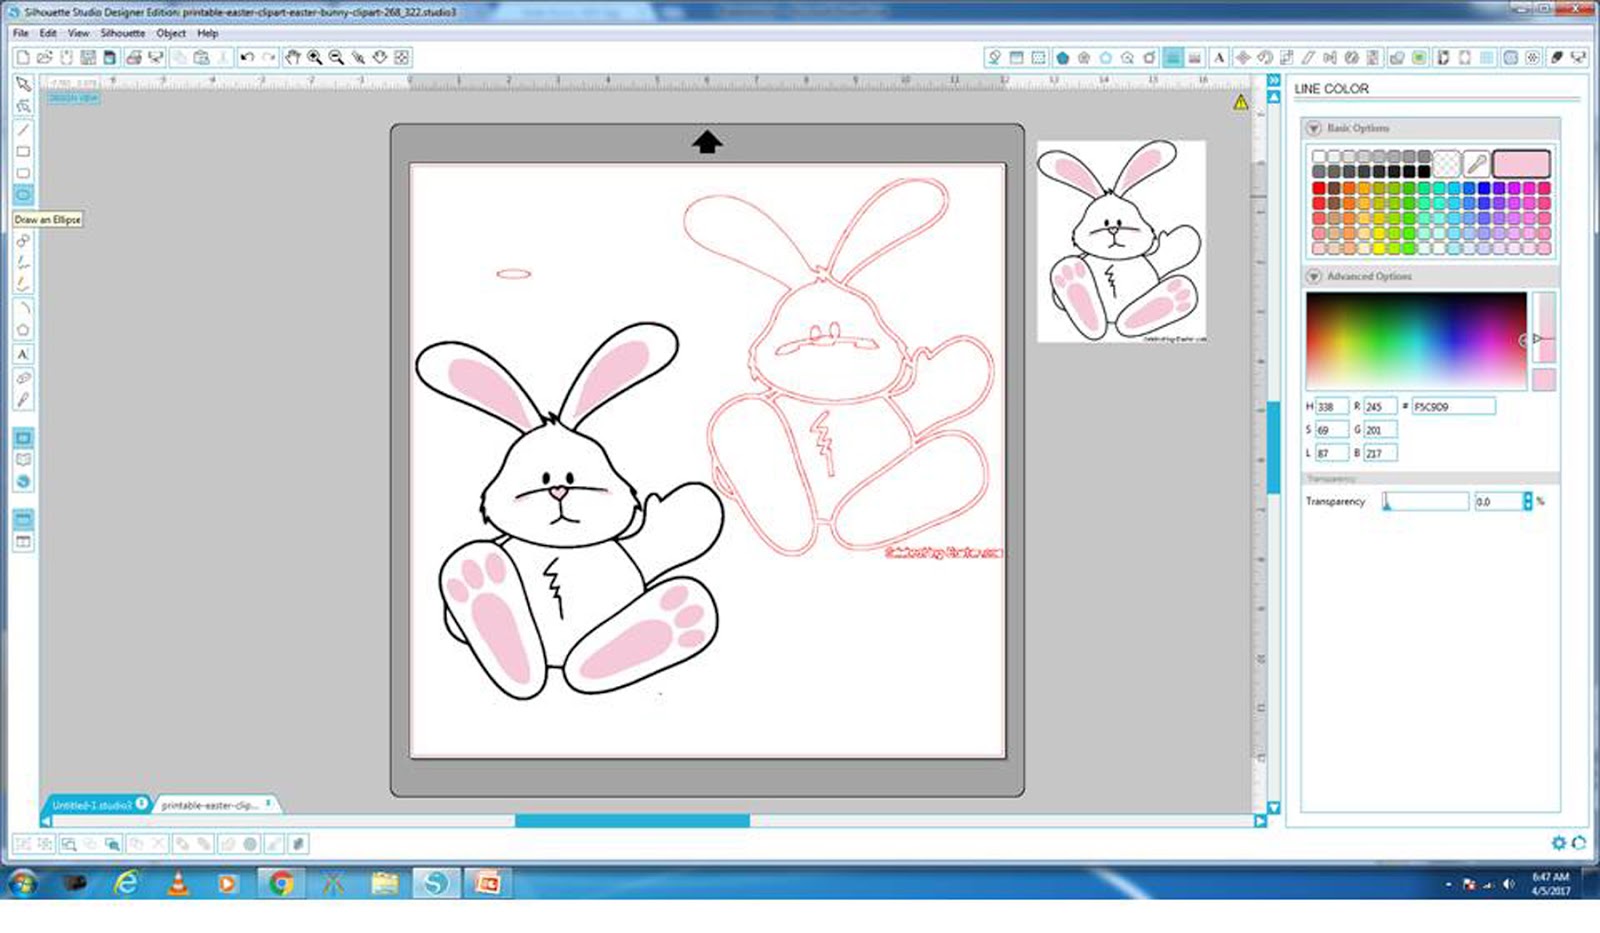
Save the image to your computer, then open it up in your Silhouette programme.
Step 2:
Now you have your image open, click on the "Trace" button which you will fine along the top. The button has a yellow square with a blue butterfly inside it. Now trace your image. If you are new to tracing please see my tutorial on tracing by clicking on this link.
Click her to learn how to trace
This tracing was ever so slightly different as I did the tracing in 2 steps due to the the pink details in the picture. So my first trace I did I concentrated on the outside lines (all the black detail) as below.
Step 3:
As you can see below I now have the black details of the image traced, but now I have started tracing again, this time concentrating on the "Pink details" of the bunny. Once you are happy with the tracing click trace again.
Step 4:
Now I sized the 2 different traces so I could have them both on the same screen shot for this tutorial but it is VERY IMPORTANT that if you want to resize the images at this stage that you have both selected and size together otherwise they won't fit.
In order to select the images and size, click with your mouse on the left button and while holding the left button down drag your mouse until everything you want to resize is selected, then release your left button and then from one of the 4 corners drag the image smaller but moving the square in once you are satisfied with the size release.
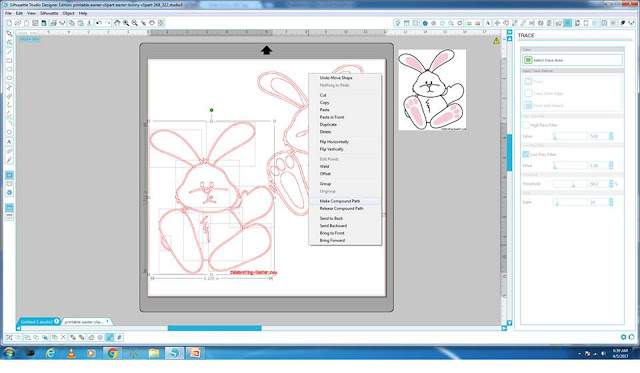
Now we have the bunny sized lets start by breaking the bunny apart. In order to do this you need to select the one bunny first and then "Right click" > "Release compound path".
You will notice a whole lot of individual little squares open up around the bunny so if you click into the FREE area now away from the bunny then you can click on the individual lines of the bunny to start manipulating what you want.
In this instance we want to select the details of the face so that they are all one, so by click on the one eye, then the next eye and then the mouth. (Don't forget when selecting multiple lines that you want to keep together you need to hold your "Shift" button down then click on the next item) Once you have selected all the details of the face (NOT THE HEART NOSE YET) you will "Right click" > "Make a compound path".
Now repeat this on the tummy area by selecting the zig zag on the tummy and the tummy itself, then "Right click" > "Make a compound path".
Now I selected all the "White" areas of the bunny. I use the coloured picture as a guide. So in this instance the "Inside ears" > "Face" > "Arm" > etc once you have selected all the "White" areas right click and "Make a compound path" (Just remember once again when selecting various areas in order to join them together you need to hold your "Shift button down".
At this stage a few of you will be saying but it's not selecting the area. Just make sure that when you trying to select an area that you click ON THE LINE, it doesn't work if you click in the centre of the area.
 |
| In this image I am selecting the face features |
 |
| In this image I am selecting all the white area of the bunny |
Step 5:
Now before I start working on the pink areas I need to colour the area's I have just worked on. And to do this I click on the "Paint bucket" along the top. If you hold your mouse over the paint bucket is says "Open the fill colour window". I then clicked on the "outer area of the bunny and then clicked on "Black", then I clicked on the area that should be white and then clicked "White". Now you should have an image like mine below.
JUST REMEMBER THAT COLOURING THE IMAGE IS JUST A VISUAL PICTURE OF WHAT THE BUNNY WILL LOOK LIKE ONCE YOU CUT ALL THE DIFFERENT COLOURS OUT.
Step 6:
Now lets work on the other bunny that you traced where you concentrated on the "Pink" areas. Once again, click on the bunny "Right click" > "Release compound path".
Now you want to select all the pink areas, but in this instance you will see the left ears, pink area is joined to the white area and we need to break them apart. There are a few way in which to do this but in this instance the best for me was to "Double click" on the ear and get the "Edit points" - lots of black dots. Now I clicked on the dot at the bottom right of the pink area and then clicked on "Delete point", I repeated deleting the points until all I had left was the pink area I wanted. (You will see the pink smudges under the eyes, I left as I will just draw that in later using the drawing tool)
Once I have the pink area I wanted I clicked on all the pink areas keeping them in position then I "Right clicked" > "Make a compound path". Now you can either colour the areas pink now or move it first then colour it's up to you.
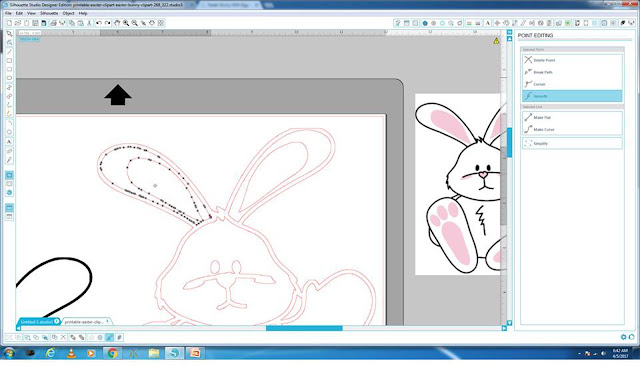 |
| Deleting the Edit points to break the pink area away from the white area |
Step 7:
In this instance I moved it first but when I did I noticed that my pink area was going behind the colour bunny that I worked on first so in order to bring it to the front you need to "Right click" > "Bring to front"
Then drag the feet and ears over the 1st coloured bunny until you happy with the placement.
Step 8:
Now colour the pink area's using the paint bucket "Fill" window again, this time colouring it pink.
Then you can delete all the area's of the bunny you don't want so you just left with the coloured bunny and the original picture.
Now in order to make the smudges under the bunnies eyes, I drew 2 ovals using the "Draw an Ellipse" tool on the left hand side. Once I had an oval I coloured it pink and moved it into position.
Step 9:
Your completed bunny ready to start cutting.
Just remember you will need, black, white and pink cardstock to make this bunny.
Step 10:
I placed all the pink areas I need to cut on the cutting surface and moved the black and white areas off into the grey area (Anything in the grey area won't cut). I then put the pink cardstock onto my cutting mat and cut the pink areas. When that was cut I then put white cardstock onto the cutting mat and cut the white area, followed by the black.
Now you can ink and glue the various area's together to make a cute paper piecing bunny.
I hope you enjoyed this tutorial, and I would love to hear from you or see what you create. I have also included the "Free cut file", simply click on the link below to download the file.
xoxo
Liane